Tampilkan postingan dengan label pastel color nailarts. Tampilkan semua postingan
Jumat, 29 Maret 2013
Happy Easter and Do Your Nails!
Hello everyone, i'm 100% sure that now all of you are having a looong weekend holiday, aren't you? And this holiday, some of us are also having easter. And because i really adore cute stuffs and designs, i fall in love with every easter manicure that i saw in the internet so i decided to make one. And here is it, my bunny, carrot, and of course the egg and the spring atmosphere!
And these are what i need to make this manicure..
*ps: there are so many polishes i needed here and i wont spell one by one, just ask if you wanna know the name of the colour :D
And last but now least, the most important one before all of these...... base coat!
So, happy easter for all of you that celebrate it, and also happy holiday for everyone of you! :D
This post is
2013 nails
,
base coat
,
bunny nails
,
easter manicure
,
easter nails
,
faceshop nailpolish
,
OPI
,
pastel color nailarts
,
revlon nail polish
,
spring nails
Senin, 10 Desember 2012
Seduced by The Flirty Leopard
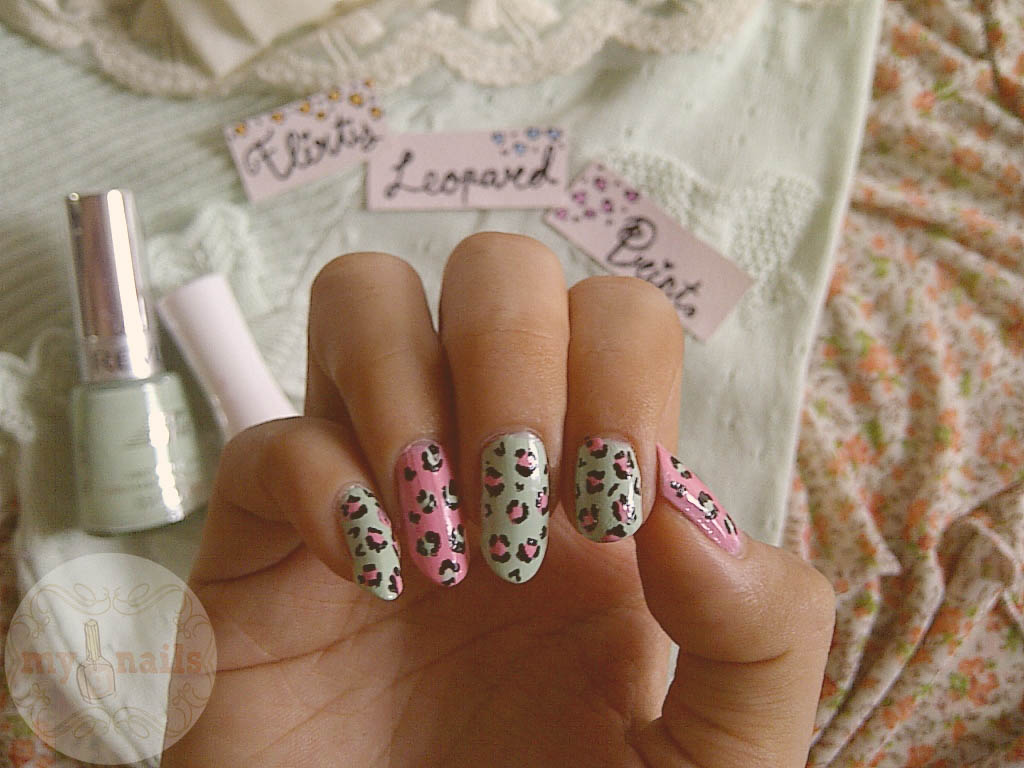
Recently i saw so many animal prints mani on others' blogs, google, instagram, and also pinterest. They did cows, pigs, giraffes, and most of them did leopaaards! Aww, I really love the last one. You know, who dont? Leopards print can be done with any colour as long as you put the print people will know that you just did it. For example, the Katy Mani that i just did last time, the leopard print i made on my nails done with pink and gleaming purple and it still look as leopard, isnt it? :D
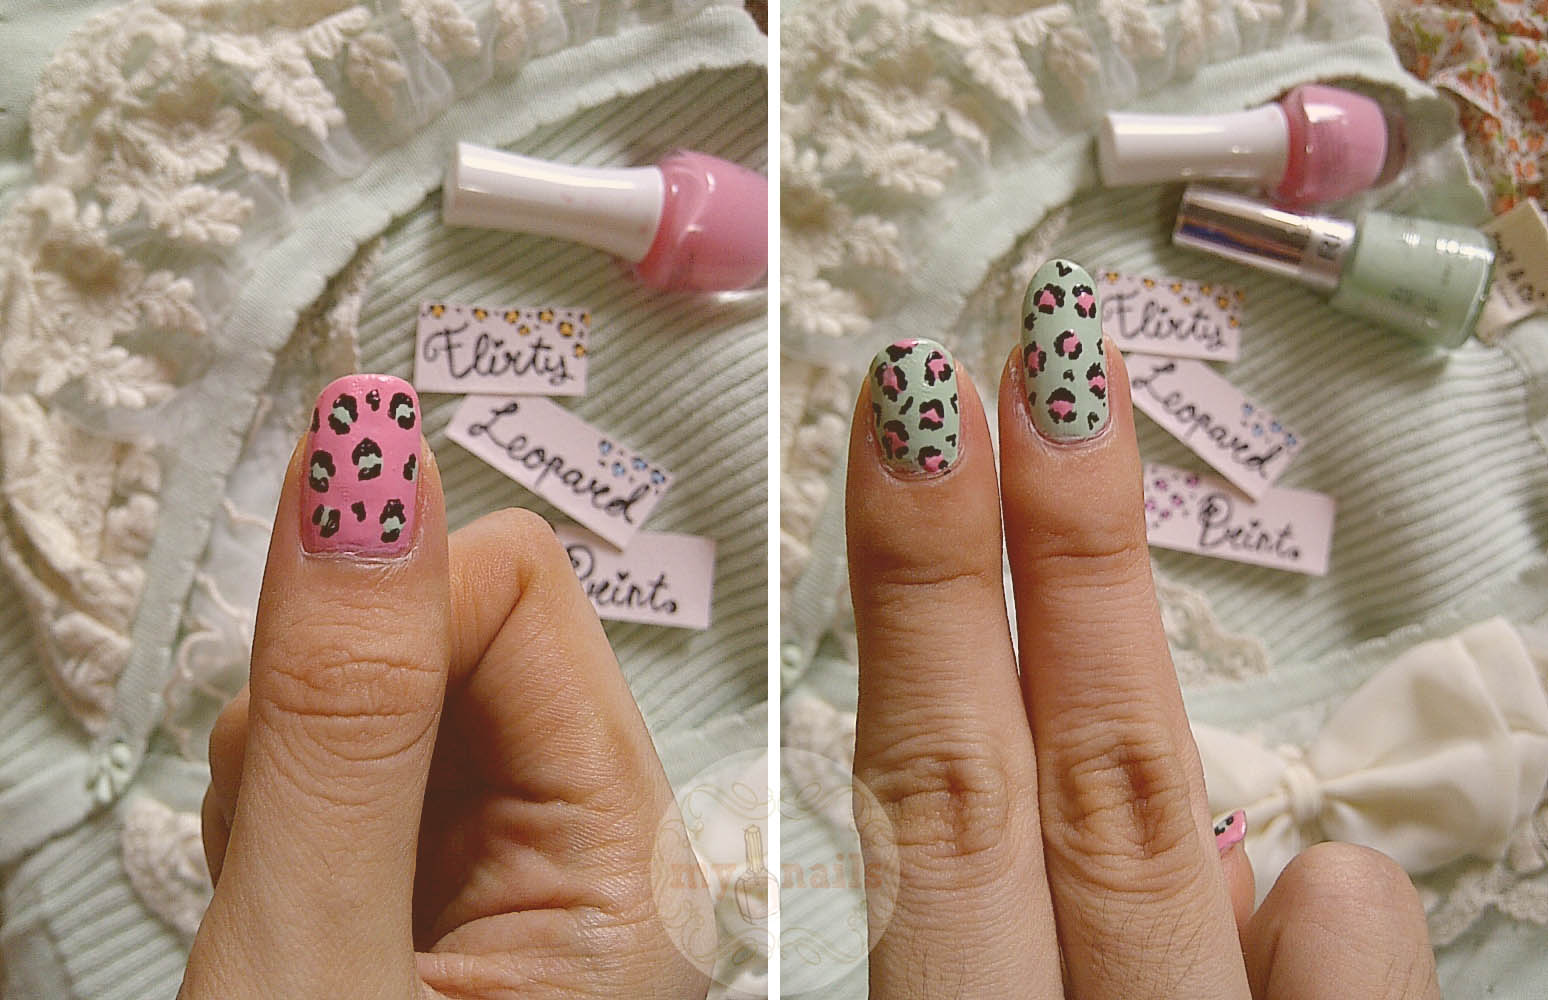
So, this time, i'll make it one more time (i cant handle myself not to do it because so many people made it and the results are sooo pretty!) and this time i'm using my favorite pastel colours, lemon drop, lilac, mint, and of course pink..
My left nails done with lemon-drop from FaceShop and lilac colour from Revlon. And for the spots i made it with black dotting pen from FaceShop. It really helps me recently, so easy to apply and sticked welll with the other polishes.. here they are my left nails..
What do you think? umm my first impression after i saw my lilac-lemon coloured nails with those spots i just think that.. i need to try with another colour! hahaha
Umm wait, are you curious to see the step by step?
if you dont, could you please pretend to be a lil bit curious about it? because i already make the step by step hahahahaha
here is it, the step by step to make the spots, go go go!
i make it in 4 steps and you can see it from left to right :)
And these are all that you need to make it,
1. base colour (polish)
2. spots colour (polish)
3. dotting tools or dotting pen to make the spot outline
So, i made my second attemp by making the more flirtatious than the first one.. with pink! and after choosing some colours to be combined with pink, i choose the adorable mint colour from Revlon..
and here they are! My right hand nails painted with pink and mint, and also.. dont forget the spots! Rawr!
Those are all the spot i got, how about yours? Do you have your own version of leopard prints mani?
It's gonna be fun to see the other versions of it! yeayy :D
So, this time, i'll make it one more time (i cant handle myself not to do it because so many people made it and the results are sooo pretty!) and this time i'm using my favorite pastel colours, lemon drop, lilac, mint, and of course pink..
My left nails done with lemon-drop from FaceShop and lilac colour from Revlon. And for the spots i made it with black dotting pen from FaceShop. It really helps me recently, so easy to apply and sticked welll with the other polishes.. here they are my left nails..
What do you think? umm my first impression after i saw my lilac-lemon coloured nails with those spots i just think that.. i need to try with another colour! hahaha
Umm wait, are you curious to see the step by step?
if you dont, could you please pretend to be a lil bit curious about it? because i already make the step by step hahahahaha
here is it, the step by step to make the spots, go go go!
i make it in 4 steps and you can see it from left to right :)
And these are all that you need to make it,
1. base colour (polish)
2. spots colour (polish)
3. dotting tools or dotting pen to make the spot outline
So, i made my second attemp by making the more flirtatious than the first one.. with pink! and after choosing some colours to be combined with pink, i choose the adorable mint colour from Revlon..
and here they are! My right hand nails painted with pink and mint, and also.. dont forget the spots! Rawr!
Those are all the spot i got, how about yours? Do you have your own version of leopard prints mani?
It's gonna be fun to see the other versions of it! yeayy :D
This post is
2012 nail
,
december mani
,
december nails
,
flirty nails
,
korean style nails.
,
leopard mani
,
leopard nail art
,
leopard nails
,
leopard prints
,
pastel color nailarts
Sabtu, 17 November 2012
My Polkie Dolkie November
It's already in the middle of november. Seems like time run faster than i thought. And i have soooo many waiting lists for my blog post. Because my internet connection down really often this last couple days but in the other hand i kept making nailarts, so that's why it happened -___-
For this post, i just choose randomly from my 'upcoming post' folder.. and ta-daaa! My polkadots nails post was choosen. So here it is!
If you see this post you may think it's just a common dots with pastel colours just like what i usually did. But if you notice, i make the dots and the base colour by some pastel colours. Not only one or two but three, baby pink, lilac, and white. As far as i can remember, i've never did something like this before. And this time, i make the dots smaller than what i always did. Do you realize it? :D
Here they are my baby-mani for my november, polkie-dolkie!
I make this mani as simple as.. it's like.. umm how to say it? The point is this time i want to make a really simple mani but i still can enjoy the colour and how the dots perfectly spreaded on every nail. And i think i did it, because i can stand with this mani for couple days (almost more than a week) without thinking to change it.. hehehe
Because sometime, the most precious design is the simplest one. It's not about how much you spent for the polishes, or how complicated your design is.. it's all about the happy and joy feeling everytime you make your nails. It's too priceless to be payed with anything ;)
For this post, i just choose randomly from my 'upcoming post' folder.. and ta-daaa! My polkadots nails post was choosen. So here it is!
If you see this post you may think it's just a common dots with pastel colours just like what i usually did. But if you notice, i make the dots and the base colour by some pastel colours. Not only one or two but three, baby pink, lilac, and white. As far as i can remember, i've never did something like this before. And this time, i make the dots smaller than what i always did. Do you realize it? :D
Here they are my baby-mani for my november, polkie-dolkie!
I make this mani as simple as.. it's like.. umm how to say it? The point is this time i want to make a really simple mani but i still can enjoy the colour and how the dots perfectly spreaded on every nail. And i think i did it, because i can stand with this mani for couple days (almost more than a week) without thinking to change it.. hehehe
Because sometime, the most precious design is the simplest one. It's not about how much you spent for the polishes, or how complicated your design is.. it's all about the happy and joy feeling everytime you make your nails. It's too priceless to be payed with anything ;)
This post is
2012 nail
,
dots nailart
,
korean style nails
,
love nails
,
nailarts
,
pastel color nailarts
,
polkadots nailart
,
vintage nailarts
,
vintage nails
Minggu, 21 Oktober 2012
Braided Nails
I've been being so curious about making a braid.
Since when i was a little girl i always ask my grandma (because my mom can't did any kind of braid and tail) to do my hair. And she like to made my hair braided.
Jusk like the other girls, i loved it!
And recently, on nails blog, tumblr, pinterest, and some instagram's pages, i often see a braid inspired nail.
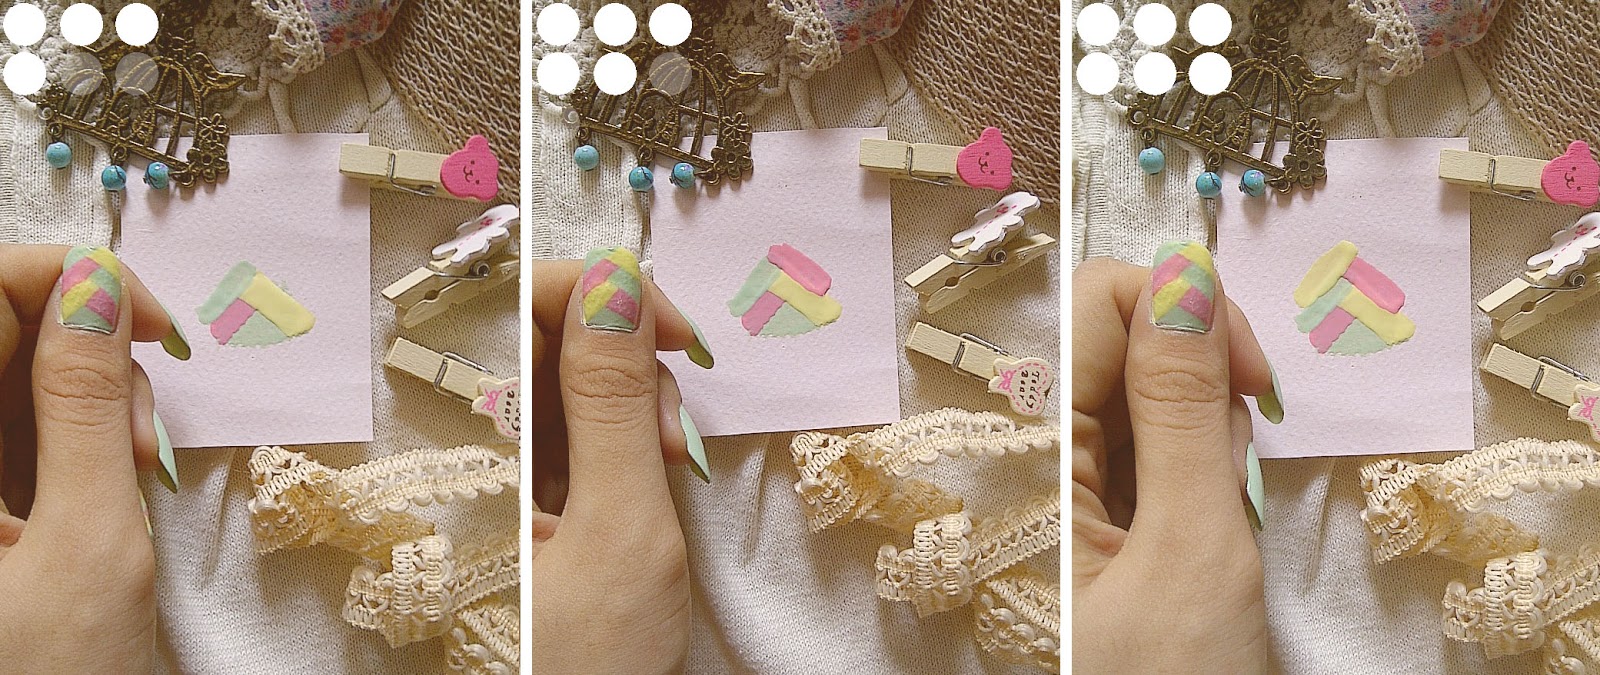
From what i've learned, it usually needs at least 3 colours of nail polishes.
And it usually just done on thumb and ring-finger.
Because if you apply the braid on all of your nails, they're gonna be seen so 'crowded' and some flaws may make it even worse.
So, because this is my first trial of it, i make the braid only on my thumbs and ring-fingers..
And as usual, i made the step by step.. and also as usual, i've already done with my nails so i made it on a paper.. i hope it's clear enough to see :)
Can you make one to on your nails?
It needs patient and a-really-really-careful left hand to make it.
That's why i also make it only on my four fingers, and for the other six, i choose (again and again) my favorite colours, Jaded from Revlon. This mint colour just toooo good on my nails, at least that's what i think hahaha
Anyway,
you can use glitters and lining to hide the flaws if you can't make it as tidy as what you've seen..
maybe next time i will make the example for the lining and also glitters, just wait ;)
This post is
2012 nail
,
braid
,
braid tumblr
,
braided nails
,
korean style nails
,
nail arts
,
nailarts
,
october nails
,
pastel color nailarts
,
pastel nailarts
,
vintage nails
Kamis, 11 Oktober 2012
Cross Cross by Check Check
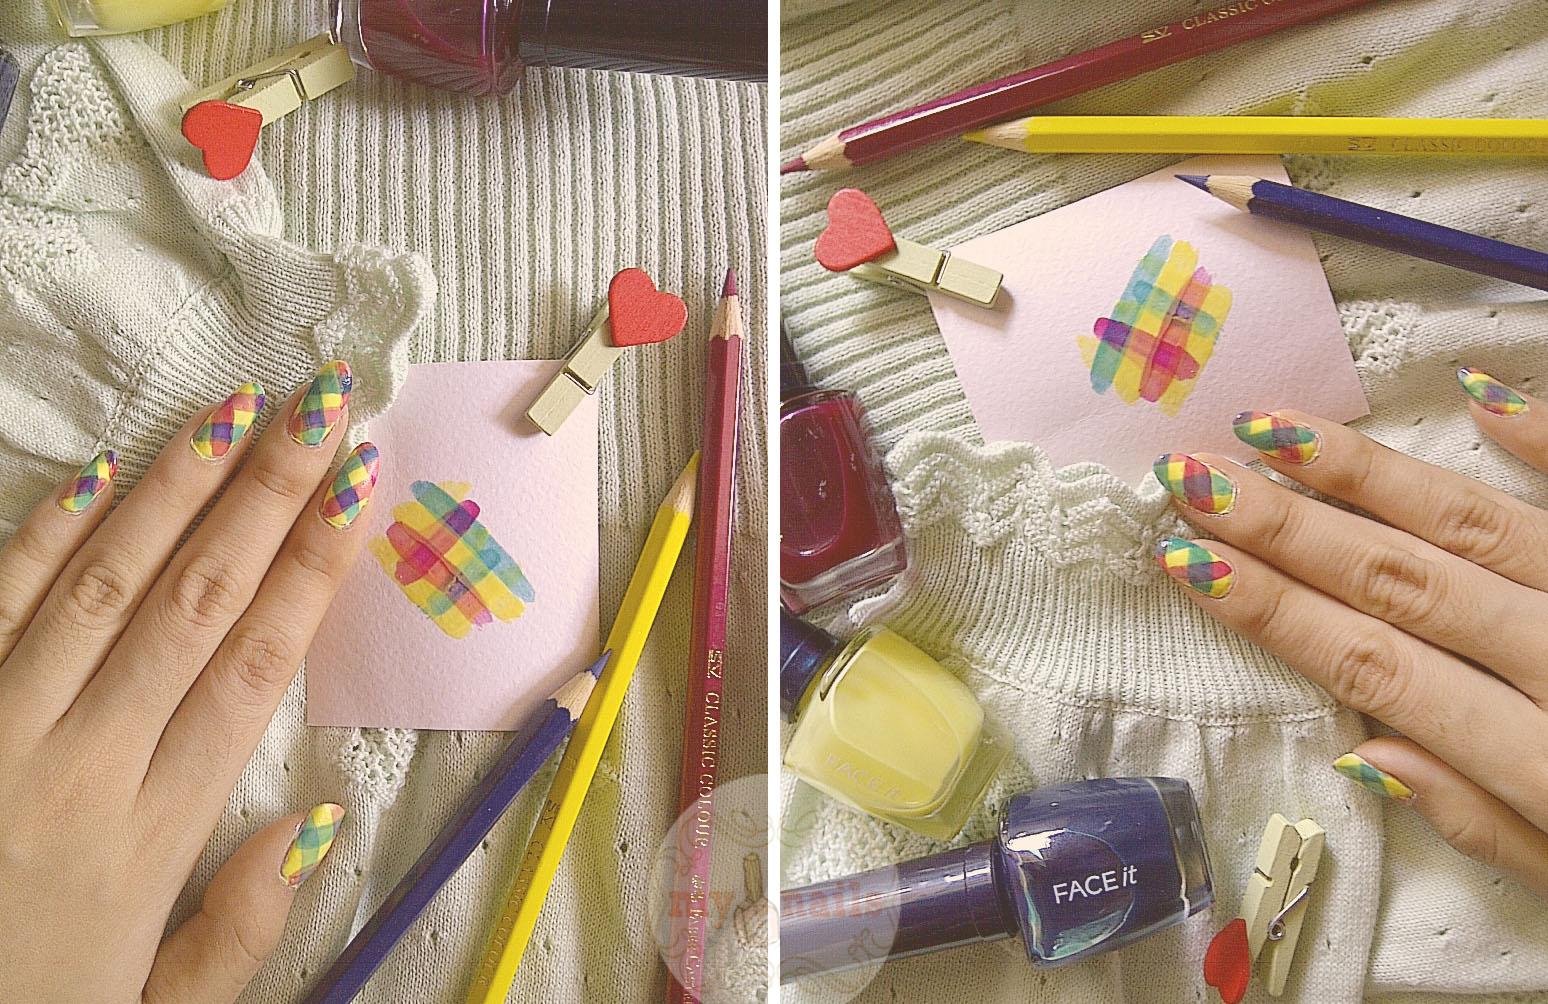
Last month my friend celebrated her 21st birthday and her friend gave her a set of Check Check Nail Kit by Face Shop.
Ew so lucky! And she got confused how to make a nail-art by those transparent nail polishes.
That's why yesterday she brought it up with her when she came and sleep-over at my home.
And after check the whole package of it, we could find the user guide there. Just right behind the package -__-
Because it was also the first time for me to make that kind of nail-art (okay it's nail-painting again also) and also the first time i was using that kind of nail polish. I've never used any kind of transparent nail polish before.
So i was just following the guide. It's my nails, Icha's, and also Tiki's nails that became my experiment last night.
But yeaaaay, i did it (almost) well. It looks good but a little bit awfull in some parts. You should know how hard it was to make the crossing patterns.
And it was really late when i tried to paint those nails, the hardest part was when i had to hold my drowsiness huhu
Luckily, the nails were done well!
Happy birthday again, Icha! Maybe it was my personal birthday gift for you, special nail-art, made with full of struggle! :p
And as always, i also make the step-by-step but i dont think it's clear enough. I just hope you can understand and try the better one on your nails :)
before you start the steps, i remind you that i was using white nail polish as the base colour so the transparent colours look better.
1. apply the colour line by line. it takes so much patient so i hope
you have thousands of it to make the straight one.
2. make an opposite directioned line after the base colour dried.
3-4-5. make the other opposite directioned lines on it until the whole base lines covered.
DONE!
p.s. it was really hard to make my right nails with my left hand. pffftt
This post is
2012 nail
,
bloggers
,
friends
,
korean style nails
,
nail arts
,
nailarts
,
october nails
,
pastel color nailarts
,
pastel nailarts
,
vintage nailarts
Langganan:
Postingan
(
Atom
)