
Hello, today i'm going to tell you my first experience doing water decal nailart! Basically i really love it because the best thing about doing this technique is you can do even the most difficult and complicated pattern and design just in a couple minutes and you wont mess with the design because you just need to put the sticker/pattern on your nails, very different with free hand nailart technique which you have to draw one by one and takes a very loooong time (but free hand give you a very different kind of satisfaction that water decal cant give you, btw :p)
**Halo, hari ini aku akan berbagi sedikit pengalaman pertamaku menggunakan water decal nailart. Sebenernya, aku sukaaaa banget teknik ini, kenapa? karena dengan pakai water decal sticker, kita ga perlu gambar satu per satu desain/pola yang kita mau. Cuma perlu beberapa menit dan pasti hasilnya ga akan berantakan, karena sangat berbeda dengan teknik gambar langsung, otomatis water decal sangat cepat & sempurna, cuma pasti rasa 'puas'nya bakalan bedaaa banget juga sama kalau kita gambar free hand hehe**
So this is the tools that you will need to do this water decal nailart :
**jadi ini beberapa peralatan yang dibutuhkan untuk melakukan nailart dengan teknik water decal**

NAIL-BASIC-KIT : consist of 6 tools, they are nail clippers, nail buffer, nail nippers, and the tools to fetch every small gap on the nails (i think, hahaha) **terdiri atas 6 alat, yaitu alat pemotong kuku, penghalus kuku, pinset kuku, dan alat kecil untuk mencapai setiap celah kecil pada kuku/jari dan kuku**
NAIL POLISH : this time i only use 1 nail polish as the basic color, you can use more if you want. One thing that i almost forget here, dont forget the top coat for the finishing :p **kali ini aku hanya menggunakan 1 warna kutek sebagai warna dasar di kuku, bisa lebih jika ingin. Dan satu hal yg aku hampir lupaaa, jangan lupa top coat untuk finishing setelah sticker ditempel agar water decal nailart kamu lebih tahan lama hihi**
WATER : water used to stick the sticker to the nails, the sticker wont work if it's not wet before you stick it to the nails, but the polish need to be dry before you put the sticker! **air digunakan untuk merekatkan sticker ke kuku. Sticker tidak bisa bekerja tanpa air, hampir sama kerjanya seperti tatto-tatto mainan anak-anak yang harus ditempel dengan air hahaha tapi ingat ya, kutek di kuku harus kering dulu sebelum sticker ditempelkan.**
WATER DECAL STICKER : water decal sticker can be found anywhere online, i think. But for me, i usually get it from The Nail Fairy Shop (on instagram). I can found so many designs there in a very reachable price! **water decal sticker bisa ditemukan secara online di berbagai sosial media/toko online. Tapi aku biasa beli di The Nail Fairy Shop di Instagram (@thenailfairyshop)**
This time i'm using my Donald & Daisy Water Decal Sticker, here's how it looks after i finish the whole nails :
**Kali ini aku menggunakan sticker water decal ku yang bergambar Donal & Desi Bebek (i really loveeee them!) dan ini adalah tampilan setelah aku selesai men-nailart seluruh kuku tangan**


The Donald and Daisy are perfectly drawn there, right? Because it's a sticker, can you imagine how much time that you need to draw them all by free hand? With water decal you only need around 5 minutes and voila! :D but there's one thing that i really love from water decal is the sticker feels like tattoo, they're not 3D and can stick perfectly longer than the common sticker.
**Donal & Desi tergambar dengan sangat sempurna, kan? karena mereka nggak digambar tangan hahaha bayangin berapa lama waktu yang dibutuhkan untuk menggambar semuanya itu? Dengan water decal cuma butuh 5 menit dan bisa selesai semua. Dan satu hal lagi yang kusuka dari water decal adalah water decal tidak 3D seperti sticker pada umumnya, dan lagi dia tahan lebih lama :)**
And here's my version of step by step (idk if there's another way to do it, but i do it this way hehe)
**dan ini adalah langkah-langkah tutorial water decal nailart yang aku lakuin di rumah, kalau ada yang punya cara lain mungkin bisa di-share hehe**


1 - apply the base color **aplikasikan kutek yang mau kamu
gunakan sebagai base color/warna dasar**
2 - 3 - cut the water decal sticker paper to make every
sticker separated from the other ones so it’s gonna be easier for you to apply
it **potong kertas/lembaran stiker water decal (per item sticker/desain) supaya
gampang saat pengaplikasiannya nanti**
4 - with the nipper, pick the sticker and put it into the
water, wait until a couple second **dengan pinset masukkan sticker ke dalam
air, tunggu beberapa detik**
5 – 6 - while it’s still wet, pick the sticker gently from
the paper and still with the nipper, put the sticker onto your nails **selagi
masih basah, pisahkan sticker dari kertasnya secara hati-hati dan dengan teteap
menggunakan pinset, letakkan sticker ke kuku**
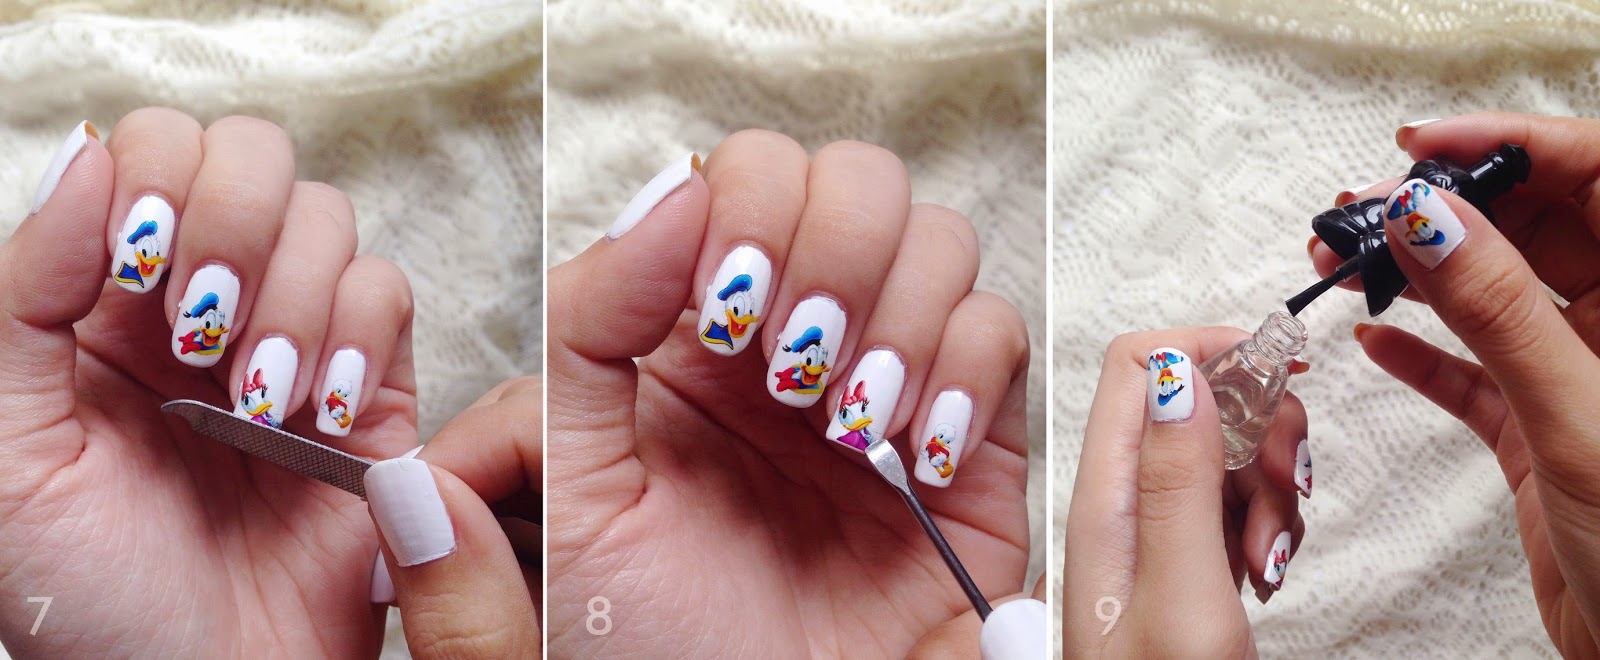
7 - if you want to place the sticker on the tip of your nail,
you can fix it with the nail buffer board **jika ada sticker yang ingin
diletakkan di ujung kuku, rapihkan sisa sticker dengan buffer/pengasah kuku**
8 - use the tool to pat-pat on your sticker to make it
perfectly stick with your nails **gunakan alat yang ada pada peralatan nailart
basic mu untuk meratakan bagian terkecil pada sticker agar dapat menempel dan
rata dengan sempurna**
9 - use the top coat as the finishing, with it the water
decal may last longer on your nails. On mine it may last at least 1-2 weeks
**gunakan top coat untuk melapisi water decal nailart mu agar dapat bertahan
lebih lama. Biasanya dengan top coat, nailart bisa bertahan 1-2 minggu jika
tidak mengerjakan pekerjaan rumah yang berat**
And it’s done! These 9 steps only takes 5-7 minutes, and i
really love it!
**dan selesai! 9 langkah itu Cuma butuh 5-7 menit lho kalau aku hehe, dan aku sukaaa banget! Karena dengan waktu yang cepat tapi tahannya bisa laamaaa dan hasilnya bagus.**

So, have you get or maybe try your water decal nailart? I
think water decal really help you if you’re a beginner :)
**Jadi, apa kamu udah cobain water decal nailart? Menurutku
teknik ini sangat membantu jika kamu masih baru dalam nailart :)**
xoxo


